Staircase Gallery Walls: 7 Layouts That Follow the Rise
The pictures on this page are AI-generated illustrations of each idea, not photographs of real homes. How this site is made.
Nobody warns you how hard a staircase wall actually is. Flat walls forgive mistakes. A staircase does not.
Every step changes the angle your eye travels, so frames either flow with that rise or fight it. Most folks guess, hang things straight across, then wonder why it looks off. Gravity pulls your eye down the rail while your frames sit level, and that mismatch is what makes a gallery wall feel wrong without you knowing why.
Good news, there is a fix. Follow the actual slope of your stairs, not some imaginary straight line.
Once you match the rise, frames feel planted instead of random. Curved staircases, tight corners, steep runs, each one needs its own approach.
Below are seven layouts that respect the stairs instead of ignoring them. Pick the one that matches your space and your patience for measuring, then adjust from there.
1Even Stair Step Diagonal With Matching Botanical Prints

That diagonal line of six matching prints is the whole trick here. Each frame sits the same distance from the one before it, and they climb at the exact same angle as the stairs. Nothing fights the slope, so your eye just glides up with it.
This works because every frame is the same size and uses the same mat color, which keeps the rhythm steady even as the wall height changes. To copy it, measure the rise of one step and use that same vertical gap between each frame center.
Keep horizontal spacing identical too. Lay it out on the floor first using paper templates taped to the wall before you commit to a single nail hole.
Do not eyeball the spacing by standing on the stairs, your brain lies about angles there. Use a straight edge or string line to mark each frame center before drilling.
2The Pyramid Climb Up A Tight Stairwell Corner

This one starts with a single frame at the top and spreads wider row by row, in a rough Christmas tree shape. It works so well here because the wall itself is narrow and tall, exactly the kind of awkward corner most staircases have. Matching charcoal frames keep it calm even though the photos and art prints inside are all different.
Start your top frame centered above the highest stair tread you can see, then add rows below, keeping gaps tight and even, around two inches. Let the bottom rows spread wider than the top ones. Use a level on each row before you hang the next, since one crooked row throws off the whole shape fast.
Build the whole pyramid on the floor first using paper templates taped to the wall, then hang frames into the marked spots instead of guessing as you climb.
3Stacked Navy Ledges That Climb With The Stairs

This one uses three floating ledges instead of single nails, and that's the smart part. Each shelf steps up at the same angle as the stairs, so the whole thing feels planned, not random. The navy color grounds all the mismatched frames, gold, wood, black, so nothing looks chaotic even though no two frames match.
Little extras like the bird figurine and the planter break up the photo grid so it doesn't feel like a wall of faces. If your staircase wall is long and awkward, ledges solve the leveling problem fast. You just lean frames instead of measuring forty nail holes.
Shift pieces around whenever you want, no new holes needed. Keep each ledge spaced evenly from the stair rise above it so the stepped pattern actually reads as intentional.
Space ledges using the same rise-to-run ratio as your stairs, not random gaps. Leave a little breathing room between frames so the shelf doesn't look crammed or cluttered.
4Botanical Cluster That Climbs The Stair Wall In A Loose Diagonal

Count the frames here and you get a solid dozen, but the eye only catches three or four sizes repeating. That's the trick. One big fern print anchors the middle, then smaller botanicals and a couple of round frames fill around it like puzzle pieces.
Nothing lines up on a strict grid, yet it still reads as neat because every frame is the same warm wood tone and the mats are all cream or white. For your own stairs, pick one large print first and hang it at eye level on a middle step.
Build outward with smaller pieces, keeping gaps even, roughly two to three inches. Mixing round and square shapes keeps it from feeling stiff.
Don't mix frame colors in this style. Pick one wood tone for every piece, or the cluster stops looking planned and starts looking like leftover frames from different rooms.
5Grid Cluster With A Round Mirror Breaking The Lines

This layout keeps the frames close together, then throws in one round mirror to stop it from looking stiff. The mix of family photos with one textured art piece gives your eye something to pause on instead of just scanning boxes. Most of the frames match in color, which holds the whole thing together even though the shapes vary.
Stagger the rows slightly as you climb the stairs so the top of each frame lines up with the slope, not with a straight horizontal line. Tuck the round mirror in among the frames, as it is here, so it acts like a breather between the photo blocks. Leave even gaps, roughly two to three inches, between every frame so the wall reads as one piece, not a pile of separate pictures.
Check what the mirror reflects from the stairs before you fix its place. It shows whatever faces it, so make sure that view is worth seeing twice.
6The Floor-To-Ceiling Brick Wall Cluster

That brick wall is doing half the work here. Dozens of white frames, mixed sizes, two round ones thrown in, all packed tight against rough brick. No grid, no strict lines, just a mass of frames that reads as one big shape when you stand at the bottom step.
This works because the wall has height to spare, the kind you only get next to a staircase that climbs two full stories. Start near eye level on the lower steps and build outward and upward from there, letting the cluster taper as it reaches the ceiling.
Keep frame colors matched to white or cream so busy photos and prints don't fight each other. Brick gives you texture already, so the frames can stay simple and plain.
Don't try this on a short stair wall with low ceilings. It needs real vertical space, or the cluster will look cramped instead of full and intentional.
7Steady Same-Size Frames Climbing A Curved Staircase

A run of small black frames marches up this wall in one clean line, each one a step apart from the last. Same size, same spacing, no fuss. That simplicity is what makes it work on a curve like this, since matching frames read as one calm shape even when the wall bends with the stairs.
Grab a long level or a laser line and mark your increments before you touch a nail, since even a small angle error compounds fast over a long run. Measure the rise of each stair step and copy that same gap between frames. Keep the art simple too, since busy prints fight with a staircase that's already doing a lot visually.
Dry fit every frame with painter's tape first and stand at the bottom of the stairs to check the line before you commit to a single nail.
How To Find The Right Diagonal Angle For Your Stairs
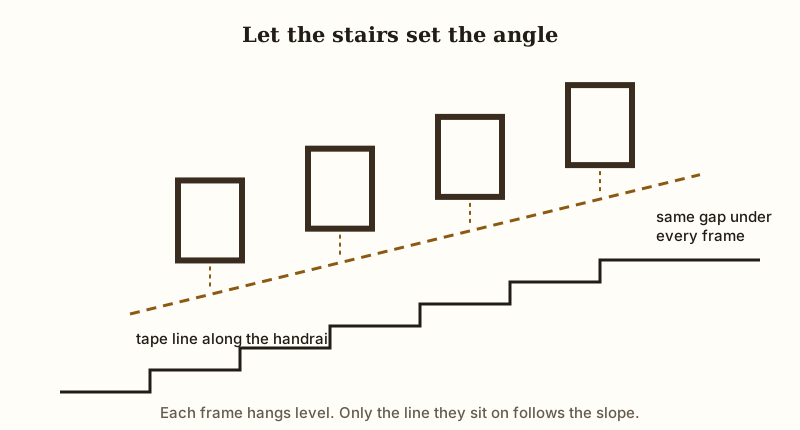
You probably think you need a fancy angle finder or some math formula to get stair art straight. You don't. Grab a long strip of painter's tape and lay it right along your handrail or the stair nosing, the edge of each step.
That line is your guide. It matches your exact stairs, no two homes are the same pitch, so forget online templates that promise a universal angle.
Next, pick a consistent offset, say eight inches above the tape line for the bottom edge of every frame. Hold each frame up to that spot before you commit to anything. Keep that gap the same for every single piece as you climb the stairs.
Most people eyeball this and end up with frames drifting off the line by the time they reach the top. Working off one steady measurement stops that drift completely.
Tape out your whole layout before you touch a drill. Cut paper templates the size of each frame, tape them to the wall, and step back to check the rhythm from across the room. Walk up and down the stairs too, since the view changes as you move.
Adjust anything that looks off while it's still just tape. Once it reads right from every angle, then you drill.