6 Hallway Gallery Walls for Narrow Spaces
The pictures on this page are AI-generated illustrations of each idea, not photographs of real homes. How this site is made.
Narrow hallways get treated like leftover space, not real rooms worth decorating. That's a mistake.
People walk through them every single day, more than any other spot in the house. So the walls deserve some attention too.
Most advice about gallery walls assumes you have wide open space to spread frames out. Hallways rarely give you that luxury.
Width is tight, ceilings might be low, and furniture is nonexistent. Layouts need to work with awkward corners, stair angles, and door frames instead of fighting them.
Good news though. Narrow spaces actually make some layouts look sharper, because your eye has less room to wander. A tall stack draws the gaze upward.
A diagonal line follows the slope of a staircase perfectly. Tight grids feel intentional instead of cramped when the wall itself is already slim.
Here are six layouts built specifically for skinny hallway walls, stairwells, and awkward corners.
1Stacked Vertical Trio In A Tight Corner Nook

That skinny stretch of wall next to a doorway looks useless until you stack frames straight up instead of side by side. Three matching botanical prints, same size, same rust mats, same black frames, line up in a tight column that uses height instead of width. That's the whole trick for narrow hallways.
Nobody has room to go wide, so go vertical and let the repetition do the work. Measure your gap first, then pick a frame size that leaves a few inches of breathing room on each side.
Keep spacing between frames even, an inch or two is plenty. A small table underneath with a plant or tray grounds the whole stack so it doesn't float awkwardly on the wall.
Don't eyeball the spacing between frames, measure it every time. Uneven gaps are the fastest way to make a clean vertical stack look sloppy and off balance.
2Six Matching Frames In A Single Marching Row

Six identical wood frames, same size, same spacing, same black and white photo style. That's the whole trick here. No mixing sizes, no odd angles, just one clean line marching down the hall toward the window.
It works because the hallway is tight and narrow, so your eye only ever sees it straight on, like a filmstrip. The matching mats and frames keep the busy brick and stone photos from fighting each other. This setup is forgiving for renters too, since six small holes beats one giant piece needing anchors.
Measure your wall length first, then divide evenly so the gaps between frames stay identical the whole way down. Keep frame centers at the same eye level height throughout the run.
Use a level and a spacer block between frames instead of eyeballing it, or your row will drift crooked by the fourth frame and everyone walking past will notice.
3A Diagonal Cascade Of Black And White Photos

That zigzag run of photos down the wall is doing a lot with a tight corner. Same wood frames, same mat size, just stepped down in a loose diagonal from high to low. That repetition is why it reads as neat instead of cluttered, even packed into a skinny strip of wall next to a door.
For your own narrow hallway, pick one frame style and stick with it everywhere. Measure the gap between the door frame and the corner first, then plan your diagonal so the lowest photo clears the radiator and skirting board.
Leave two to three inches between frames so the eye can follow the line without it feeling cramped. This trick works great for awkward leftover wall slices most people ignore.
Do not let the lowest frame crowd the radiator. Heat and rising dust are hard on prints, so leave a clear gap above it.
4A Tight Grid Of Dark Frames On A Two Tone Wall

Eight dark frames stacked in a tight block, with narrow gaps between each one. The botanical line drawings inside are simple and quiet, so the frames and the grid shape do the heavy lifting here. Against that warm white and terracotta wall, the dark frames pop without fighting the space.
Grids work great in narrow halls because they read as one solid block instead of scattered dots. Keep your gaps even, two to three inches is plenty, and use a level or paper template before you touch a nail.
Mixing portrait and landscape frames like this adds rhythm without breaking the grid feel. Stick to one frame color and one mat style so the wall stays calm, not busy.
Measure twice before drilling. People eyeball grids and end up with crooked rows that are obvious the moment you walk down the hall toward the light.
5A Picture Ledge Shelf Over A Row Of Coat Hooks

That ledge shelf doing double duty is the smart part here. It holds three leaning frames up top and clears space below for hooks, a coat, a bag, a scarf. Nothing is drilled through twice, nothing wobbles, and you can swap the photos whenever you want without touching a hammer.
For a narrow hallway this matters because you're not losing floor space to furniture, just using the wall smarter. Grab a ledge shelf, screw it into studs at eye level or a bit higher, lean in a few matching frames, then mount hooks right underneath.
Keep the frame sizes similar so the row looks calm instead of cluttered. This setup earns its spot because it's storage and decor in one single move.
Don't overload the hooks with heavy coats, the shelf above can tip forward if the wall anchors aren't rated for weight and tugging.
6Round And Rectangular Frames Clustered Beside The Stairs

This gallery wall sits on the wall beside the stairs, where a hallway usually runs out of flat space. A handful of frames cluster tightly around one larger piece in the middle, mixing round and rectangular shapes so it never feels stiff or too matched up. Dark frames against that sage green wall give it real contrast, and the abstract prints keep things calm instead of busy.
For your own stair wall, lay the frames out on the floor first and decide which piece goes in the center before you touch a hammer. Keep gaps even, roughly two to three inches, and build outward from that center frame so the group stays compact.
Do not line the group up with the floor. Let its outer edge follow the angle of the stair rail, while every single frame still hangs level.
How Wide Does Your Hallway Need To Be For This
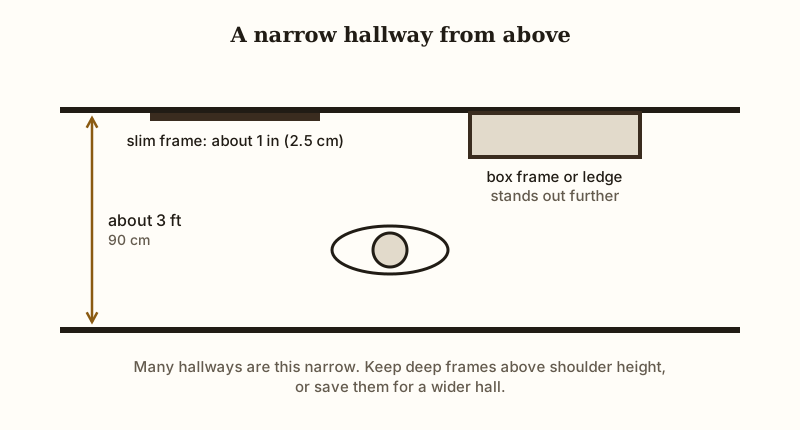
Most people grab frames, start hammering, and find out the hallway was too tight only after someone clips a corner with a shoulder. Measure first. Many hallways are only about three feet wide, and every frame takes a little of that back.
Depth is the number to watch, not layout. A slim frame with a flat mat stands barely an inch off the wall and suits almost any hallway. Deep box frames, thick moldings and picture ledges stick out further, so save them for wider halls or hang them above shoulder height, where nothing brushes past.
Viewing distance changes things too. Nobody can step back in a narrow hall, so big, busy grids are seen only in pieces. Rows, columns and small tight groups read better at arm’s length than one sprawling wall.
Then check what moves. Open every door along the wall and see where it swings.
Think about laundry baskets, bags and kids running through. Build in room for real life, not just for the tape measure.